


Introduction
In this course you would learn about the basics of Django web framework and would be able to build basic projects with the knowledge you will gain from this tutorial.
Before moving on with this tutorial you are expected to have basic knowledge of python and some frontend technologies as little as HTML(HyperText Markup Language) it would be great if you also have little knowledge of CSS(Cascading Style Sheet), with little knowledge of all the requirements listed above you can go on with the tutorial.
As a beginner you might be wondering what is Django web framework use for and are they job opportunities for django developers yes i would give you reasons why you should learn Django web framework the opportunities you would likely get if you become a Django develop through my story, i started learning Django back in 2020 and it was fun i built little project with it and posted it online for my friends to see yeah i was proud of myself each time i had issue with any of my project i post those issues online either in a django developer group or in other platforms i was amazed on how i got replies fast from more experienced developers, few months after building three project and posting them online i got a message from a ceo of an agency offering me a django role i was been honest to tell him that i didnt have the experience,i was then later offer an internship and started the internship almost imidiately, in the story you would realize that django has a very huge community that is willing to help anytime also you would discover that it is easier to get jobs relating to that role faster because they are in high demand hope you have gotten a good answer to your question.
What is Django web framwork?
Django—pronounced “Jango,” named after the famous jazz guitarist Django Reinhardt—is a free, open source framework that was first publicly released in 2005. Django facilitates “rapid development and clean, pragmatic design.” The Django web framework, deployed on a web server, can help developers quickly produce a web frontend that’s feature-rich, secure and scalable.
As a beginner you are advised to go through the django documentation first to have more insight about the framework and how it works.You would need to have python installed into your computer and be able to use the pip manager.
Installing django
All you need to do is to open your terminal or your code editor terminal and run this piece of code into it make sure you have internet access
$ python -m pip install Django
after running this piece of code you would need to confirm that it is installed into your system and python can recognise it you can confirm by running the piece of code in you python shell
#terminal
$ python3
>>> import django
>>> print(django.get_version())
3.2
After getting something like this as you output you can now progress to the next step django3.2 is the version used in this tutorial
Creating your first Django project
As a beginner this is the point that would require a lot more attention than the introductory aspect, yeah you are about to create your first backend project, for the tutorial sake we would be creating a todo application as our first project i find this project more beginner friendly and it is easier for beginner to understand what is going on, let us move on you would need to open a new terminal or command prompt then copy the code bellow into it
#terminal
$ mkdir Todo #mkdir command to create a folder with the name Todo
$ cd Todo #cd to change directory into Todd
$ django-admin startproject todoapp
A lot of you might be confused already asking yourself where did "django-admin startproject todoapp" command come from don't worry you would understand why in seconds, django-admin startproject is a command that is use to initialize your project you would discover that after running the command some folder would be create for you in your folder
todoapp/
    manage.py
    mysite/
        __init__.py
        settings.py
        urls.py
        asgi.py
        wsgi.py
#this is how it would be in your code editor
what are all this files for? i know you keep asking yourself you actually don't need to master them all as we build you would understand there uses below is a brief explanation of the files you see above The outer todoapp/ root directory is a container for your project. Its name doesn’t matter to Django; you can rename it to anything you like.
manage.py: A command-line utility that lets you interact with this Django project in various ways. You can read all the details about manage.py in django-admin and manage.py.
The inner todoapp/ directory is the actual Python package for your project. Its name is the Python package name you’ll need to use to import anything inside it (e.g. mysite.urls).
todoapp/init.py: An empty file that tells Python that this directory should be considered a Python package. If you’re a Python beginner, read more about packages in the official Python docs.
todoapp/settings.py: Settings/configuration for this Django project. Django settings will tell you all about how settings work.
todoapp/urls.py: The URL declarations for this Django project; a “table of contents” of your Django-powered site. You can read more about URLs in URL dispatcher.
todoapp/asgi.py: An entry-point for ASGI-compatible web servers to serve your project. See How to deploy with ASGI for more details.
todoapp/wsgi.py: An entry-point for WSGI-compatible web servers to serve your project. See How to deploy with WSGI for more details.
After understanding what this files are use for what next? we now go to one of the most interesting part which is running our local server, django web framework has a command we can use to activate our local server which we can see in the snippet bellow
###  terminal

$ cd todoapp #to access the manage.py
$ python manage.py runserver
#this should be your output
Performing system checks...

System check identified no issues (0 silenced).

You have unapplied migrations; your app may not work properly until they are applied.
Run 'python manage.py migrate' to apply them.

October 18, 2021 - 15:50:53
Django version 3.2, using settings 'todoapp.settings'
Starting development server at http://127.0.0.1:8000/
Quit the server with CONTROL-C.
After geting your output like that all you have to do is to copy this url into your browser 'http://127.0.0.1:8000/'

you should be able to see the image above in your browser too, congratulations you are now a backend developer
Creating your Todo(app)
After creating your project and other things you might be wondering what next, we would need to create a new app where we can write code specifically for the todo, dont be confused already i know we created a project with the django command and now we will have to create a new app again what are the difference between the two words metioned.
Projects vs. Apps
What’s the difference between a project and an app? An app is a Web application that does something – e.g., a Weblog system, a database of public records or a small todo app. A project is a collection of configuration and apps for a particular website. A project can contain multiple apps. An app can be in multiple projects.
if taking all this may seem too much for you you can take a break and come back i promise it would sink in, so now let us moveAdding template further by creating a todo (app) inside our todoapp(project) by using the code below
$ python manage.py startapp todo

#note this below would be created inside you todo just like that of todoapp
todo/
    __init__.py
    admin.py
    apps.py
    migrations/
        __init__.py
    models.py
    tests.py
    views.py
after doing this you have success fully created your todo(app) inside of todoapp(project), the next thing now is to let the todoapp(project) know that you have create a todo(app) so they can keep track of each other, now head to the todoapp(project) and locate the settings.py check the code snippet bellow
todoapp/settings.py
#locate the installed apps

INSTALLED_APPS = [
    "django.contrib.admin",
    "django.contrib.auth",
    "django.contrib.sites",
    "django.contrib.contenttypes",
    "django.contrib.sessions",
    "django.contrib.messages",
    "django.contrib.staticfiles",
    # add your app here and save
    'todo',
]
you have successfully informed your project about you app you can do same for multiple apps too that is the convention.
###Create your first todo(app) view
todo/views.py
from django.http import HttpResponse


def index(request):
    return HttpResponse("Hello, world. You're at the tod index.")
This is the simplest view possible in Django. To call the view, we need to map it to a URL - and for this we need a URLconf.
To create a URLconf in the todo directory, create a file called urls.py. Your app directory should now look like:
polls/
    __init__.py
    admin.py
    apps.py
    migrations/
        __init__.py
    models.py
    tests.py
    urls.py
    views.py
#in the todo/urls.py file include the following code:
todo/urls.py #path

from django.urls import path

from . import views

urlpatterns = [
    path('', views.index, name='index'),
]
The next step is to point the root URLconf at the todo.urls module. In todoapp/urls.py, add an import for django.urls.include and insert an include() in the urlpatterns list, so you have:
todoapp/urls.py

from django.contrib import admin
from django.urls import include, path

urlpatterns = [
    path('', include('todo.urls')),
    path('admin/', admin.site.urls),
]
all you need to do now is save your work and run your server once again.
Go to localhost:8000 in your browser, and you should see the text “Hello, world. You’re at the todo index.”, which you defined in the index view.
###Setting up your first Database
By default Django provide us a SQLite database to confirm your can head to 'todoapp/settings.py' and locate the code in the snippet below
# Database
# https://docs.djangoproject.com/en/3.2/ref/settings/#databases

DATABASES = {
    'default': {
        'ENGINE': 'django.db.backends.sqlite3',
        'NAME': BASE_DIR / 'db.sqlite3',
    }
}
For the sake of this tutorial we would stick with the default database that is provided by django
Creating your todo(app) Model
For us to able to work with the SQLite database we would need to create our todo(app) model that would be mapped to SQLite database . so how do we get started with creating our model, the first thing is to locate our app which is todo after that locate the models.py file in it and now copy what is seen in the snippet below .
from django.db import models


class TodoModel(models.Model):
    name = models.CharField(max_length=20)
Now what have we just written? at first we imported the (models) from Django so we can have access to the things we need in it ((models.Model) just like the normal python convention after that you can also see (TodoModel) what is that for? it is use as the name of the model created so we can have access to the model trough importing the name into our code also we can also see 'name = models.CharField(max_length=200)' as a python developer you already know that (name) is a variable then what is added in it we can see that we called the models.CharField(max_length=200), CharField is a character filed in Django it allows us to be able to add characters to the database example 'i am a coder', you can read more about fields in Django through the docs it is advisable to go through the documentation so as to get in dept knowledge of the different fields in Django.
Migrations
After creating our todo model we would need to inform our SQLite that a model as been create and we want it to create a table based on the model we create to do that all you need to do is follow the code in the snippet
#Terminal
$ python manage.py makemigrations todo
#You should see something similar to the following:
Migrations for 'todo':
  todo/migrations/0001_initial.py
    - Create model TodoModel
$ python manage.py migrate
#You should see something similar to the following:
Operations to perform:
  Apply all migrations: admin, auth, contenttypes, todo, sessions
Running migrations:
  Rendering model states... DONE
  Applying todo.0001_initial... OK
By running makemigrations, you’re telling Django that you’ve made some changes to your models (in this case, you’ve made new ones) and that you’d like the changes to be stored as a migration.
The migrate command takes all the migrations that haven’t been applied (Django tracks which ones are applied using a special table in your database called django_migrations) and runs them against your database - essentially, synchronizing the changes you made to your models with the schema in the database.
Using the django shell
In this aspect of the course we would be interacting with the django shell, for you to have a better understanding about this shell the official django docs has a very good explanation on this so you can check it out, you don't necessarily need to know all about it since we are not focused on it in this course. let go on by adding data into our database through the shell
#terminal
$ python manage.py shell
>>> from todo.models import TodoModel # Import the model class we just wrote.
# No questions are in the system yet.
>>> TodoModel.objects.all()
<QuerySet []>
# Create a new TodoModel.
>>> q = TodoModel(name="buy new pen")
# Save the object into the database. You have to call save() explicitly.
#note django automatically generate a unique id for every name that is created
>>> q.save()
# Now it has an ID.
>>> q.id
1
# Access model field values via Python attributes.
>>> q.name
"buy new pen"
>>> TodoModel.objects.all()
<QuerySet [<TodoModel: TodoModel object (1)>]>
#now you see that you have added a data into your database
>>> exit() #to exit shell
$
Adding template/static files
It is amazing how far we have gotten, in this part of this tutorial we would be handling the frontend part our todo app, firstly we need to create two new folder inside our project, the diagram below shows you how your project structure is expected be be like.
Todo
└── todoapp
    ├── manage.py
    ├── todo #app
    ├── templates #newly created folder
    ├── static   #newly created folder
    ├── db.sqlite3 #your database
    └── todoapp #project
After creating your folders you now need to add the files that you would need in the snippet below you would see the names of file you are to add into the template folder and the css folder
Todo
└── todoapp
    └──templates
        ├── index.html #serves as the homepage
        ├── update.html #update todo page
        └── delete.html  #delete todo page

    └── static
        └── style.css #for styling our page
Now after doing all this you would need to inform the Django project about the folders that you created just like we did to the Django apps but the template folder registration would be different for that of registering apps under the installed_app, all you need to do now head to the todoapp project click on the settings.py and add the code below.
#to record the template folder
TEMPLATES = [
    {
        'BACKEND': 'django.template.backends.django.DjangoTemplates',
        'DIRS': [ BASE_DIR / 'templates' ],    #take note of the changes
        'APP_DIRS': True,
        'OPTIONS': {
            'context_processors': [
                'django.template.context_processors.debug',
                'django.template.context_processors.request',
                'django.contrib.auth.context_processors.auth',
                'django.contrib.messages.context_processors.messages',
            ],
        },
    },
]
hi

# Static files (CSS, JavaScript, Images)
# https://docs.djangoproject.com/en/3.0/howto/static-files/

STATIC_URL = '/static/'
STATICFILES_DIRS = [ BASE_DIR / 'static' ]
Congratulations your static files and template is all setup for development
Create your todo(app) functionality(CRUD)
if you notice you would see that i added CRUD at the end of my heading we would be following the crud format while creating our todo(app) logic ( CRUD - Create, Read, update and Delete ). let's get started you would need to open your app views.py file so the logics can be written in there just as explained in previous part of this tutorial, after opening it you have to paste the code in the snippet bellow into it . but before that quickly create a form in your index.html .request
#index.html
<form action = "" method = "POST">
    <label for="tabletodo_name">Add todo : </label>
    <input id="todo_name" type="text" name="todo_name">
    <input type="submit" value="OK">
</form>

<h1>Todos</h1>
<h3></h3>
in your views.py
from django.shortcuts import render,redirect
from .models import TodoModel

#comment out your former code
#def index(request):
#    return HttpResponse("Hello, world. You're at the tod index.")

def index(request):
  todos = TodoModel.objects.all() #use to query the model
  form = request.POST.get("todo_name") #to get the data from the index.html form
  if request.method=='POST': #checking if it is a post or get method
    form = request.POST.get("todo_name")
    if form.is_valid:
      form.save()   #save the data into the datab
ase
      return redirect('/')#reirect back to same page
  context = {
    'todos':todos
  }
  return render(request,'index.html',context)
this piece of code in the views.py above does two things:
it allows the user to create to-dos into the database
it renders the data from the database into the index.html
we can also see some new this their below is a brief explanations of what they do .
request.POST is a dictionary-like object that lets you access submitted data by key name. In this case. Note that Django also provides request.GET for accessing GET data in the same way – but we’re explicitly using request.POST in our code, to ensure that data is only altered via a POST call.
render it is used to render a page for a particular view function read more from the docs
redirect it is use to redirect users to another URL read more from the docs
context it use to send information to the template read more from the docs
After a brief explanation of what is going on in the views.py we would have to setup uor index.html to work with our index view below is how to do that
#index.html
<form action = "" method = "POST">
    {% csrf_token %}
    <label for="tabletodo_name">Add todo : </label>
    <input id="todo_name" type="text" name="todo_name">
    <input type="submit" value="OK">
</form> [

<h1>Todos</h1>
<h3>{{todos}}</h3>
the code above contains some little changes which would be explained below {% csrf_token %} CSRF Token is a secret, unique and unpredictable value a server-side application generates in order to protect CSRF vulnerable resources.](neuralegion.com/blog/csrf-token/#what-is-cs..) read more
{{todos}} the todo is used to render the data from the database that was passed through the context. Note: the signs {{}} and {%%} in the index.html are called Django template language and are always unique you can read more about the through the docs . also remember that we already have a url mapped to the index views
you can check the already exiting url for the index view below
#in the todo/urls.py file include the following code:
todo/urls.py #path

from django.urls import path

from . import views

urlpatterns = [
    path('', views.index, name='index'),
]
Now save your work and run your server then in the browser locate localhost:8000
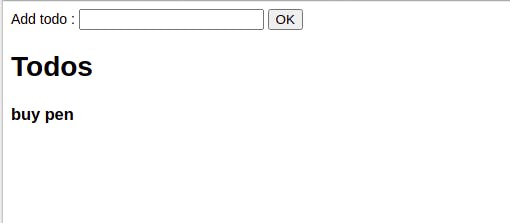
Now you can see the existing todo which we created through the shell, you can now add todo, read todo buy seeing the list of todo create congratulations you have successfully completed your course and expected to complete the task below
Task
In the tutorial above you where able to add the create and read functionality of your todo app in this assignment you are expected to add the update and delete functionality yourself using this video and github code link has a reference, after the completion you can contact me via email for submition (adeboyed93@gmail.com) .
Congratulations on the completion of your first Django beginner course. ** check out my youtube channel youtube.com/c/DannyCoddy**